Wednesday, August 21, 2013

Christopher Creek Winery

Last weekend I decided to visit Christopher Creek Winery to pick up my wine club wines.  I just so happened to be the same weekend they where doing some bottling.  Since they are a smaller winery, they rent the bottling facility and the facility is a semi-truck with a couple of trailers.  One being the pump and the other being the bottling machine.  There is a crew of about 5 or 6 running the whole operation and since I always carry my camera, I decided to try and get a few pictures.  (Also they have opened up more of the grounds and I was able to get a few pictures from around the winery.)

First let's start with some pictures of the area.  This is the 'new' pool area that was just opened up.


And this is an attempt at doing a panoramic of the valley.  This was shot basically under the umbrella from the above picture.


They also had some live music playing this day and the drummer had a visitor.  He stayed even while he played.


Here are the two pictures I took of the winery itself, I wanted to get some pictures of the bottler.  (Ok, machines fascinate me.)

To start the empties are loaded in one side of the back of the trailer.  They travel along the back side and then into a rinser type machine.  Here the clean/sterile bottle are, I believe, filled with nitrogen and then emptied by flipping them.


Once it goes through this wheel, which is at the other end of the trailer.  It then goes to the bottle filler and corker.  These are two barrel systems that take the bottle around in two circles.


After that they get their foil top and crimp.  And then on to the labeler.


Once they get the label, it is out the back of the trailer to be boxed up.


Ok lastly, I did have to collect some video of this whole process.  Here are four short videos.  The first is the bottle flipper.


Fill and corking.


Then on to the foil and sealer.


Finally to the labeler.


I would like to thank Christopher Creek and their bottler for allowing me to take these pictures.

Thursday, August 15, 2013

It's Over

Talk about a project that seemed to go on and on.

It all started last August when we had a sewer backup.  Well we have always had sewer issues, they corrected mostly when our neighbor's junipers where pulled out.  These junipers where right above the county lateral and their roots did reach into it.  Anyway, we took care of the sewer and then decided to have a camera sent down it to check its condition.  That condition was not good.  The sewer itself had flattened and pulled apart because of a cheap seal and the only thing that kept things from getting worse was the heavy clay soil that we have, which essentially kept things together.

Now to replace about 12 feet of sewer should be an easy thing, unless it goes under a retaining wall and that wall happens to be 4 feet tall.  So to do it right, we needed a permit.  To get the permit, we needed the wall to be engineered.  To be engineered, we needed soil samples.  Do you see where this is going?  Let's say we got lucky with the soil samples since we had an old soil report from when the house was built.  And using that on a general soil type of the area, the county allowed the engineered plans to go through.  (I will have to say at this point that some parts of the wall is over engineered and a detailed soil report could have reduced some of that structure.  But a detailed soil report would have added 2-3 months to the project and several $K to the engineering plans.)

So after the plans where set, construction started in May.  (I was thinking that we where waiting for the rains to end but the plans did not make it through review and permitting until February.  So the short period from February to May is the only time we waited on the rain.)

So here is what started it all.  The blue is the new completed sewer.  Once the hole was dug, the sewer was done in the first week of work.


Here are some pictures of before things got started.  The clump of ivy in the 4th picture is the wall that came down because of the sewer work.  The last picture in the bunch is the side of the house whose wall was added later at counties request.


Now for a series of during the work.  First they had to bore piers for the wall.  There is about 75 feet of retaining wall, in 4 walls.  There are 22 piers and each pier is 16 inches in diameter and 10 to 12 feet deep.  Steel rebar throughout the piers and wall.  The second and third pictures show how the bobcat operator was able to maneuver the boring drill into the right places for the piers.  The carport is only about 9 feet tall and the gap between poles and house is about 4 feet.


It took about 17 yards of concrete for the piers.  It also took an additions 25 yards of concrete for the walls themselves.  And one of the other function of the wall is to hold the driveway in place.  (The driveway is basically an after thought compared to all the other work that was required.  Actually it became the focal point of the whole project.  The walls are structural but they do not have much 'look' to them.  The driveway itself does the 'look' and also removes a lot of the dirt and rock that we had before.

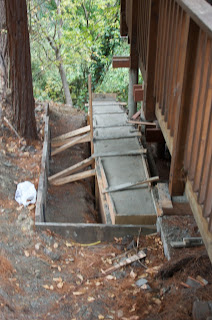
Now here ware some after pictures.  These walls have really removed a lot of hillside pressure that was on the house poles.  Also the wall on the side of the house is bowed because that was the first wall they poured and the pourer was a rookie.  They flowed the concrete into the form too quickly.  The driveway itself should help on drainage for the whole site and they raised the house side of the carport up about 6 inches to level it off.  The last picture is the part of the driveway that was added in front of the house to give/fix-up the parking space for visitors.


So that is it, almost 1 year for a project that I was hoping to get done in 2-3 months.  Let's say I have learned a lot but has this cured me of wanting to build my own home?

Monday, August 12, 2013

Monterey Bay Aquarium

Alway love taking people to the aquarium.  My daughter also loves it, thus we can spend a lot of time in the jellies and ocean aquarium.

They have 2 exhibits of jellies at this time.  The almost permanent one, plus a psychedelic one which is new.  They also have a sea horse exhibit right now but it will be leaving September 1st at that time they will be swapping it out for a new exhibit which will feature octopus, I believe that will open in 2014.  (Yeah)

So lets just start off by showing some jellies.


This little guy is one of the phosphoresces ones.


This where in the new jelly exhibit.


This is a dragon sea horse.  Pretty cool.  The other picture here is a little starfish.  My daughter's finger tip is in frame to show size.  This guy was probably brought in when they cycle the water nightly.  (They allow the bay water to flow through most if not all the exhibits nightly and only filter it in the morning so visitors can see the wonders.  This is also a way that they think a small octopus got into one of the exhibits last year.  He was able to survive and grow for a year before being discovered.)


This leatherback turtle was rescued from the bay.  He was chocking on a plastic bag which he thought was a jelly.  Like with the Great White that they had for a time, the aquarium will rehabilitate the animals and release when they get their strength back.  This turtle will probably be release in the near future.


Last is the ocean aquarium.  This is a large open aquarium with a top viewing area that is two stories tall.  I believe last year they added a lower view area at the bottom of the aquarium.  Here my daughter and I was playing, looking up into the display.  (She was a bit timid at first, thinking I was goofy getting down on the ground to look up into the display.  I was able to finally convince her and she loved it.  (It was also fun watching several other people start to do the same thing.)